| Out | In | Total | |
| Red | 2498 | 2543 | 5041 |
| Combo | 2842 | 2740 | 5582 |
| White | 3015 | 3024 | 6039 |
| Black | 3237 | 3194 | 6431 |
| Rating/Slope | ||
| Men | Women | |
| Red | 64.4/107 | 69.4/120 |
| Combo | 66.9/118 | 72.6/128 |
| White | 69.0/124 | 75.3/137 |
| Black | 70.9/128 | N/A |
-
Hole #1
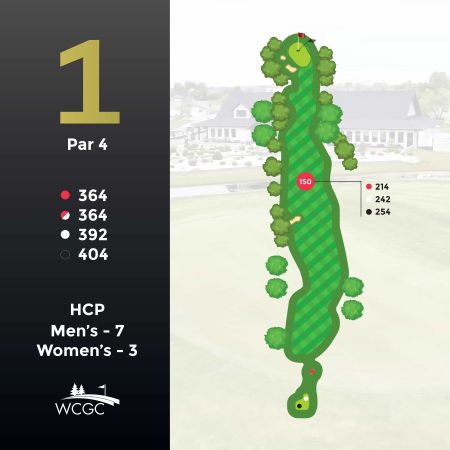
The round begins with a generously wide tee shot on this opening par 4 hole. A drive up the right side will avoid the sandtrap on the left edge of the fairway and set you up for a better angle to a demanding second shot. An approach to the right side of the green will avoid the two bunkers guarding the left side. Long or left makes for a difficult up and down for par, which is a good score to aim for on this hole.
-
Hole #2
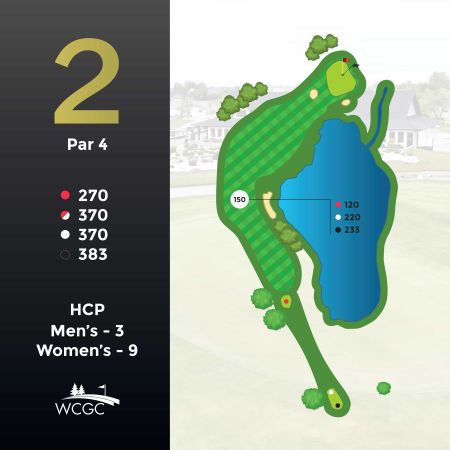
As you head out into the more open part of the course, be aware of what the wind is doing, as this can alter the course greatly. On this hole, the bigger hitters can take advantage and cut the corner over the water to set up a short approach shot. The smart play is down the centre to the corner left of the sand trap.
On the approach, there is more room between the fairway sandtrap and the green than appears. Left centre of the green is the ideal spot, and long again makes for a tough up and down.
-
Hole #3
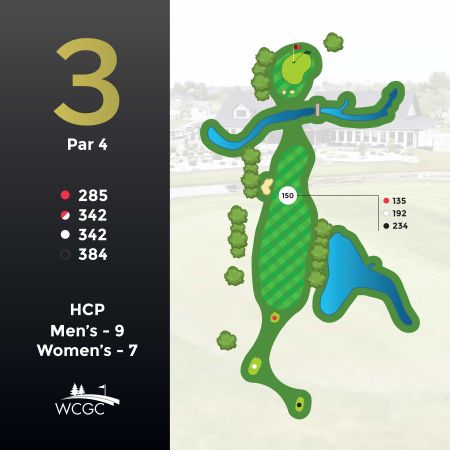
A tee shot down the right side of the fairway will give you the best angle at this green. Don’t hit your drive too far as you will run out of fairway or be hitting off the downslope. 115 yards out is ideal.
Make sure you get to the green to avoid the water hazard as well as the double sandtraps in front of the green. There is a ridge running through this deep green, so you land your ball on the correct section of the green to avoid bringing in the 3 putt.
-
Hole #4
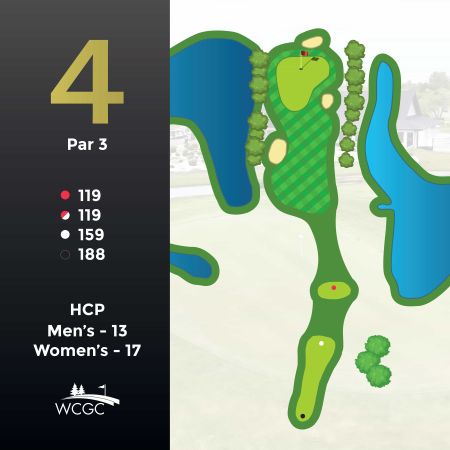
The first of 5 par 3’s on the course, make sure to check your yardage as this hole has a long tee box, so yardage might play differently than the card shows. There is water left and right of this green so an accurate shot is important. A back right pin is a sucker pin, centre of the green is always a good leave.
-
Hole #5
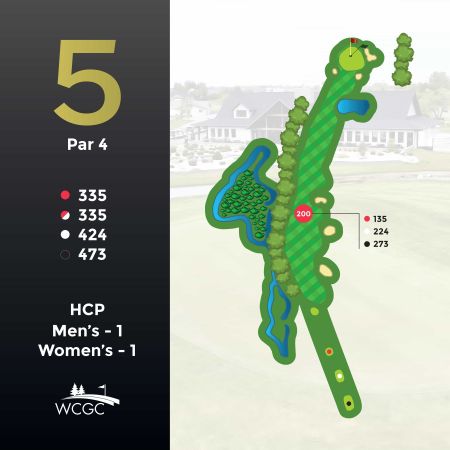
This is one of the most demanding holes on the course, a long par 4 where a drive up the left centre of the fairway will avoid the 3 traps on the right side. Too far left will find fescue or a hazard.
A straight shot to the green is important, a pond lies in wait for those short and right, while sandtraps guard the left and right side of the green. This green also slopes from front to back if you hit it too deep into the green. Par is a great score here.
-
Hole #6
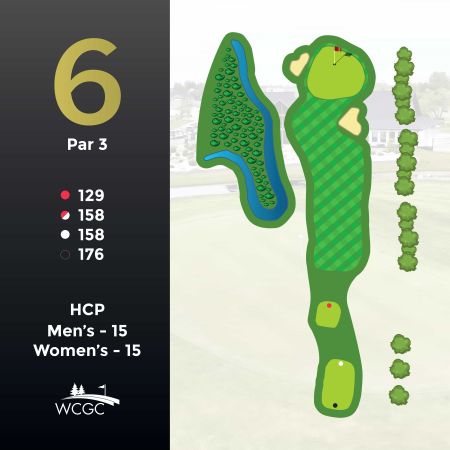
Although this par 3 has roughly the same yardage as number 4, the subtly different angle can make a big difference depending on the wind, so choose your club accordingly. Make sure you have enough to clear the sandtrap on the right front side of the green. Centre of the green should leave you with a makeable putt to most pin positions.
-
Hole #7
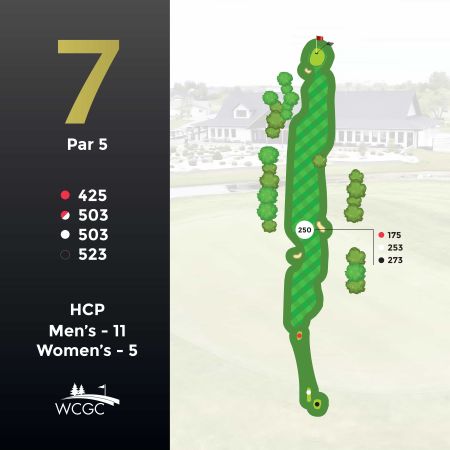
A reachable par 5 where you can let your driver go. Avoid the fairway traps left and right, as they will take away the option of going for it in 2.
If you are laying up, avoid the evergreens on the left side, as they cover the green well. The green is a saddle with everything sloping to the middle left. A high soft approach shot will prevent you from going to long which is a difficult up and down if you do. A definite birdie chance.
-
Hole #8
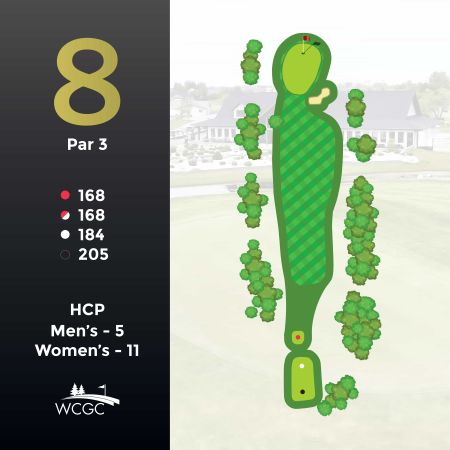
This is a lengthy par 3 and the green has a spine running down the centre of it, so err to the side the pin is on. You will need enough club to cover the bunker on the front right. This is a fairly deep green and par is a good number to leave this hole with.
-
Hole #9
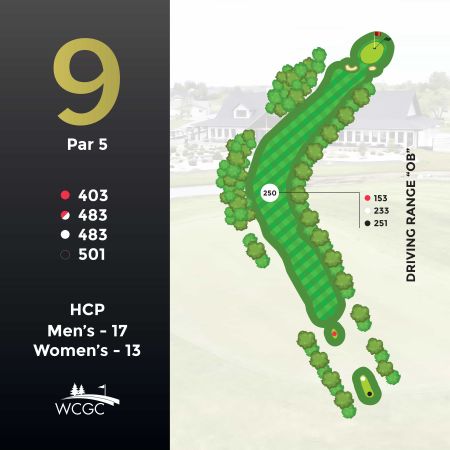
Your tee shot should favour the left side of the fairway on this dogleg right hole, unless you are a big hitter. Getting past the corner leaves a clear shot to the green, but avoid the driving range as it is out of bounds.
The green is a fairly small target, and long or right will leave you out of bounds. A lay up to a short yardage to leave an easy pitch shot in is the smart play. The green slopes slightly left to right on this hole.
-
Hole #10
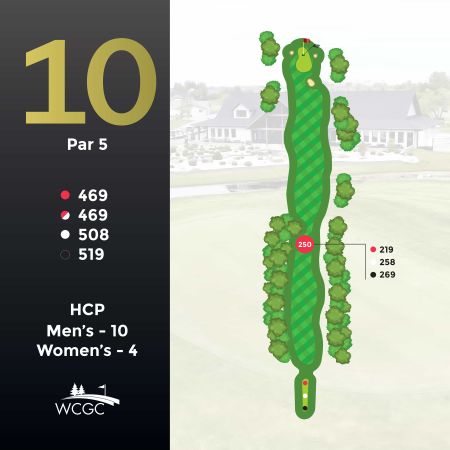
Another par 5, but this is a tighter driving hole. The ideal drive is down the right side of the fairway to avoid the tree blocking the fairway on the left. Too far right will find the railway tracks out of bounds.
For those not going for it in 2, a lay up to 125 or 80 yards will avoid the drainage ditch running through the fairway. The green is deep and has two tiers, lowering from front to back, so getting your yardage correct is key to avoid three putting. Bunkers also guard this green front, right and left.
-
Hole #11
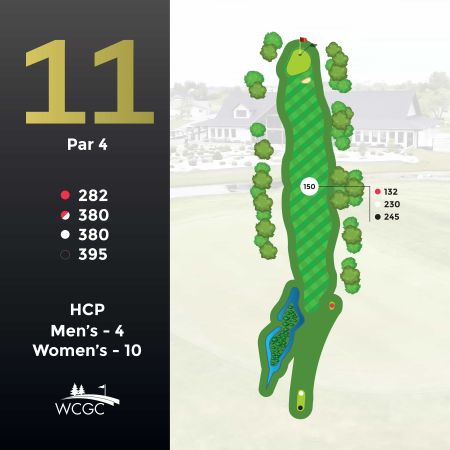
The next 2 holes play into the prevailing wind, so often play longer than they appear. The best drive here is down the left side of the fairway, setting up a good angle to the green.
Hitting to the left side of this green avoids the bunker short and right and leaves you with a makeable putt on a green sloping from front to back.
-
Hole #12
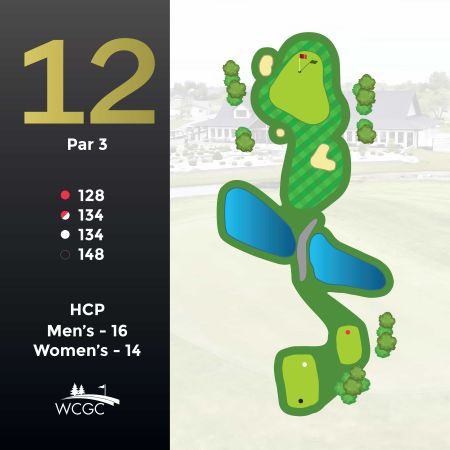
Check the wind! The right hand side of this green is the place to aim. Short left will leave you in the deepest sandtrap on the course, and long left brings a trap and fescue into play. Getting your yardage right here makes for a much easier par.
-
Hole #13
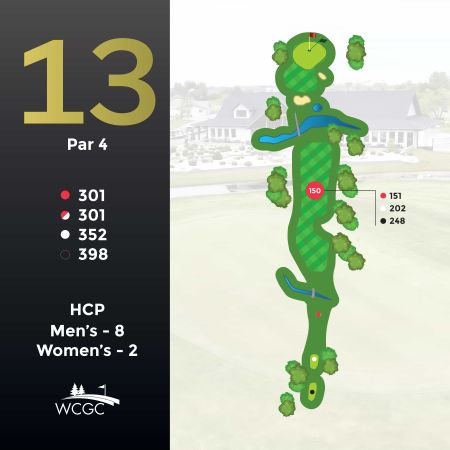
This tee shot demands accuracy. There is out of bounds right and a drainage ditch on the left. Aim to leave your ball 125 – 150 yards out, as this is the flattest part of the fairway.
The approach plays longer than it looks as you are playing slightly uphill. You have to clear the hazard and a sandtrap to get to the green. This is a large green with some subtle breaks and mounds, a two putt is good here.
-
Hole #14
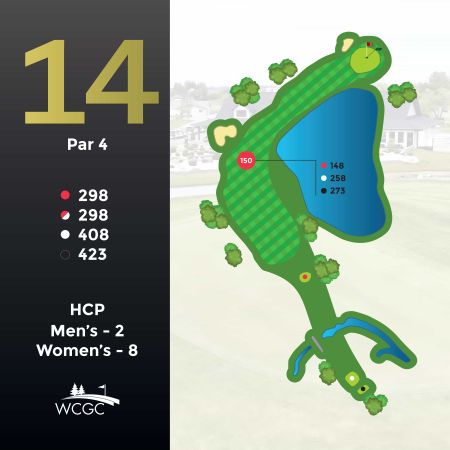
The fairway is wide down the left side and avoids the pond, but does leave a longer approach shot. Those brave enough to hug the hazard edge will be rewarded with a shorter approach on this 90 degree dogleg right.
Aim for the left side of the green to avoid the pond that runs along the length of the right side. There is a ridge that runs through the centre of the green and separates front from back, so play your yardage accordingly depending on the pin position.
-
Hole #15
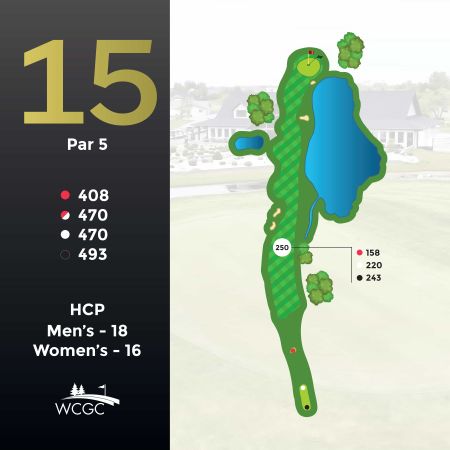
On this, the shortest of the par 5’s on the course, two strategically placed sandtraps guard the left hand side. If you can carry it 290, you can cover these bunkers and set yourself up for a good score.
For those laying up, keep it down the left side to avoid the pond which guards the right side all the way to the green. Beware of the pin if it is tucked away on the right side. This is a great birdie opportunity!
-
Hole #16
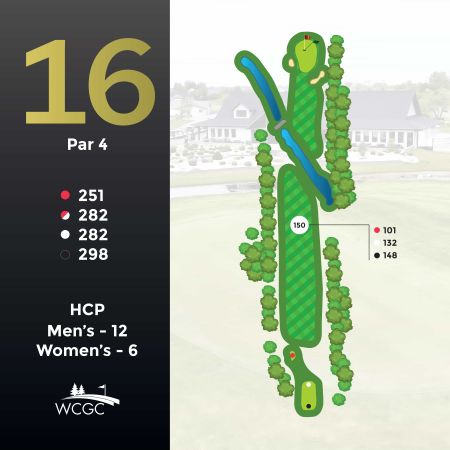
Decision time! This is a true risk reward hole. Going for the green is a possibility but it is a narrow landing area with a stream running across the fairway if you hit it short. There is also out of bounds right. The perfect layup is down the left side just short of the creek, leaving you on the flattest lie on this sloped fairway.
Leaving your approach under the pin is important on this green which is protected by bunkers on the front right and left side.
-
Hole #17
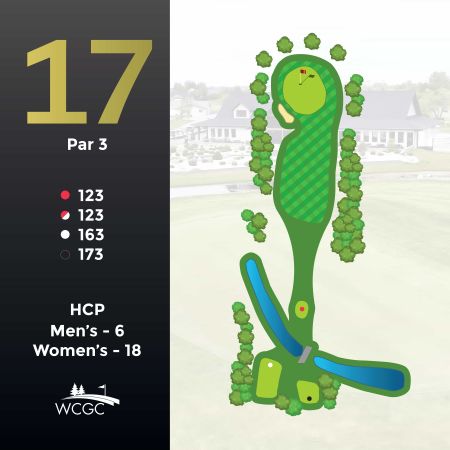
Centre or right of it will give you the best opportunity to score well on this hole. The left hand side is covered in the front by a bunker and left or long of this green will leave a very difficult up and down. Par is a good score on this hole.
-
Hole #18
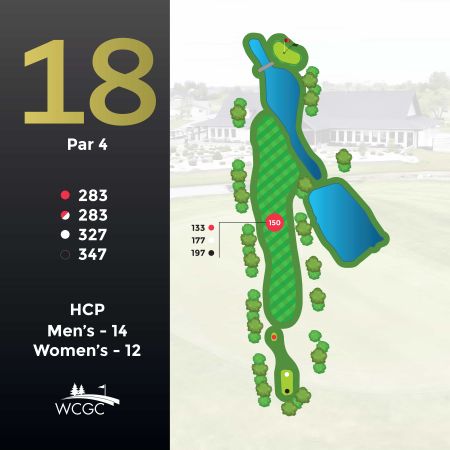
A good tee shot will set you up well on the demanding home hole. The left side of the fairway to about 100 yards will leave you with the best angle for a challenging approach shot.
You will need enough club to cover the water but this green is shallow, so precise yardage is required, a high soft shot will set you up best. The break on the green is misleading and does not break as much as it looks.